1. 概述
数组在 Go 语言中没那么常用,更常用的数据结构是切片,即动态数组。我们可以向切片中追加元素,它会在容量不足时自动扩容。
Go 语言中,切片类型的声明方式与数组相似,区别在于声明切片时只需指定切片中的元素类型。
编译期间生成切片类型的函数为 src/cmd/compile/internal/types/type.go::NewArray,从源码可以看出,切片内元素的类型都是在编译期确定的,编译器确定了类型后,会将类型存储在 Extra 字段中帮助程序在运行时动态获取。
// NewSlice returns the slice Type with element type elem.
func NewSlice(elem *Type) *Type {
	if t := elem.Cache.slice; t != nil {
		if t.Elem() != elem {
			Fatalf("elem mismatch")
		}
		return t
	}

	t := New(TSLICE)
	t.Extra = Slice{Elem: elem}
	elem.Cache.slice = t
	return t
}
编译器的切片是 cmd/complie/internal/types.Slice 类型,如下所示:
// Slice contains Type fields specific to slice types.
type Slice struct {
	Elem *Type // element type
}
运行时切片可由 reflect.SliceHeader 表示,如下所示:
// SliceHeader is the runtime representation of a slice.
// It cannot be used safely or portably and its representation may
// change in a later release.
// Moreover, the Data field is not sufficient to guarantee the data
// it references will not be garbage collected, so programs must keep
// a separate, correctly typed pointer to the underlying data.
type SliceHeader struct {
	Data uintptr
	Len  int
	Cap  int
}
说明:
- Data:指向数组的指针
- Len:当前切片的长度
- Cap:当前切片的容量,即 Data 数组的大小
Data 是一块连续的内存空间,可以将切片理解成一块连续的内存空间加上长度和容量的标识。
切片引入了一个抽象层,提供了对数组部分连续片段的引用,而作为数组的引用,可以在运行时修改长度和范围。当切片底层的数组长度不足时会自动扩容,切片指向的数组可能会发生变化。不过在上层看来切片没有变化,上层只需要与切片打交道,不需要关心数组的变化。
2. 初始化
Go 语言中包含三种初始化切片的方式:
- 通过小标的方式获得数组或者切片的一部分,如 arr[0:3] or slice[0:3]
- 使用字面量初始化新的切片,如 slice := []int{1, 2, 3}
- 使用关键字 make 创建切片,如 slice := make([]int, 10)
2.1 使用下标
使用小标创建切片是最原始也是最接近汇编语言的方式,它是所有方法中最为底层的一种。编译器会将语句转换成 OpSliceMake 操作,如下:
package slice

// newSlice 生成切片
func newSlice() []int {
	arr := [3]int{1, 2, 3}
	slice := arr[0:1]
	return slice
}
使用 GOSSAFUNC 变量编译上述代码:GOSSAFUNC=newSlice go build new.go,ssa 中间代码中 decompose builtin 阶段代码如下:
decompose builtin [22354 ns]

...

v25 (6) = SliceMake <[]int> v9 v12 v15

...

name &arr[*[3]int]: v9
name slice.ptr[*int]: v9
name slice.len[int]: v12
name slice.cap[int]: v15
从上述结果可以看出,SliceMake 操作接收了四个变量:
- 元素类型
- 数组指针
- 切片大小
- 容量
需要注意的是,使用下标初始化切片不会复制原数组或原切片的数据,而只会创建一个指向原数组的切片结构体,所以修改新切片的数据也会修改原切片。
2.2 字面量
使用字面量 []int{1, 2, 3} 创建切片时,相关的操作如下:
- 根据切片中的元素数量推断底层数组的大小并创建一个数组 a
- 将这些字面量元素存储到初始化的数组 a 中
- 创建一个同样指向 [3]int 类型的数组指针 b
- 将静态存储区的数组 a 赋值给数组 b 指针所在的地址
- 通过 [:] 操作获取一个底层使用 b 的切片
从以上可以看出,[:] 操作是创建切片的一个最底层方法。另外,如果使用字面量创建切片,大部分的工作会在编译期间完成。
3.3 关键字
使用 make 关键字创建切片时,很多工作需要运行时的参与;调用方法必须向 make 函数传入切片的大小及可选的容量。类型检查期间,会由 src/cmd/compile/internal/gc/typecheck.go@typecheck1 函数校验入参,相关代码如下:
func typecheck1(n *Node, top int) (res *Node) {

	...

	switch n.Op {

	...

	case OMAKE:
		ok |= ctxExpr
		args := n.List.Slice()
		if len(args) == 0 {
			yyerror("missing argument to make")
			n.Type = nil
			return n
		}

		n.List.Set(nil)
		l := args[0]
		l = typecheck(l, ctxType)
		t := l.Type
		if t == nil {
			n.Type = nil
			return n
		}

		i := 1
		switch t.Etype {

		...

		case TSLICE:
			if i >= len(args) {
				yyerror("missing len argument to make(%v)", t)
				n.Type = nil
				return n
			}

			l = args[i]
			i++
			l = typecheck(l, ctxExpr)
			var r *Node
			if i < len(args) {
				r = args[i]
				i++
				r = typecheck(r, ctxExpr)
			}

			if l.Type == nil || (r != nil && r.Type == nil) {
				n.Type = nil
				return n
			}
			if !checkmake(t, "len", &l) || r != nil && !checkmake(t, "cap", &r) {
				n.Type = nil
				return n
			}
			if Isconst(l, CTINT) && r != nil && Isconst(r, CTINT) && l.Val().U.(*Mpint).Cmp(r.Val().U.(*Mpint)) > 0 {
				yyerror("len larger than cap in make(%v)", t)
				n.Type = nil
				return n
			}

			n.Left = l
			n.Right = r
			n.Op = OMAKESLICE

		}

		...

	}

	...

}
上述函数不仅会检查 len 是否传入,还会保证传入的容量 cap 一定大于或等于 len。另外,该函数会将 OMAKE 节点转换成 OMAKESLICE,函数 src/cmd/compile/internal/gc/walk.go@walkexpr 会依据以下两个条件转换 OMAKESLICE 类型的节点:
- 切片大小和容量是否足够小
- 切片是否发生了逃逸
如果切片发生了逃逸或者非常大,运行时需要 runtime.makeslice 函数在堆中初始化切片。
如果没有发生逃逸并且非常小,则 make 初始化方式会初始化数组并通过下标 [:] 的方式得到数组对应的切片。
这两部分操作都会在编译阶段完成,编译器会在栈上或者静态存储区创建数组,并将 [:] 操作转换成 OpSliceMake 操作。
以下是 runtime.makeslice 函数的代码:
maxAlloc = (1 << heapAddrBits) - (1-_64bit)*1

func makeslice(et *_type, len, cap int) unsafe.Pointer {
	mem, overflow := math.MulUintptr(et.size, uintptr(cap))
	if overflow || mem > maxAlloc || len < 0 || len > cap {
		// NOTE: Produce a 'len out of range' error instead of a
		// 'cap out of range' error when someone does make([]T, bignumber).
		// 'cap out of range' is true too, but since the cap is only being
		// supplied implicitly, saying len is clearer.
		// See golang.org/issue/4085.
		mem, overflow := math.MulUintptr(et.size, uintptr(len))
		if overflow || mem > maxAlloc || len < 0 {
			panicmakeslicelen()
		}
		panicmakeslicecap()
	}

	return mallocgc(mem, et, true)
}

func panicmakeslicelen() {
	panic(errorString("makeslice: len out of range"))
}

func panicmakeslicecap() {
	panic(errorString("makeslice: cap out of range"))
}
上述函数的主要作用是计算切片占用的内存空间,并在堆中申请一块连续的内存,计算方式:内存空间 = 切片中元素大小 * 切片容量。
创建切片的过程中,如果发生了以下错误,会直接触发运行时错误并崩溃:
- 内存空间大小发生溢出
- 申请的内存大于最大可分配内存
- 传入的长度小于0或大于容量
3. 访问元素
使用 len 和 cap 获取长度或者容量是切片最常见的操作,编译器将它们看成两种特殊操作 — OLEN 和 OCAP。
访问切片中的字段可能会触发 decompose builtin 阶段的优化,len(slice) 或者 cap(slice) 在一些情况下会直接替换成切片的长度或者容量,不需要在运行时获取。
访问切片的元素使用的 OINDEX 操作也会在中间代码生成期间转换成对地址的直接访问。
切片的操作基本都是在编译期间完成的,除了访问切片的长度、容量或其中的元素外,编译期间也会将包含 range 关键字的遍历转换成形式更简单的循环。
4. 追加和扩容
切片扩容时,会先从切片中获取它的数组指针、大小和容量,如果在追加元素后切片大小小于容量,就会调用 runtime.growslice 对切片进行扩容并将新元素依次加入切片。
4.1 扩容流程
中间代码生成阶段的 src/cmd/compile/internal/gc/ssa.go@state.append 函数会根据返回值是否覆盖原变量进入两种流程。
func (s *state) append(n *Node, inplace bool) *ssa.Value {}
-
inplace 为 false,即不需要赋值会原变量,则处理为表达式 append(s, e1, e2, e3)
ptr, len, cap := s newlen := len + 3 if newlen > cap { ptr, len, cap = growslice(s, newlen) newlen = len + 3 // recalculate to avoid a spill } // with write barriers, if needed: *(ptr+len) = e1 *(ptr+len+1) = e2 *(ptr+len+2) = e3 return makeslice(ptr, newlen, cap) -
inplace 为 true,即需要赋值会原变量,则处理为表达式 **s = append(s, e1, e2, e3)
a := &s
ptr, len, cap := s
newlen := len + 3
if uint(newlen) > uint(cap) {
  newptr, len, newcap = growslice(ptr, len, cap, newlen)
  vardef(a)       // if necessary, advise liveness we are writing a new a
  *a.cap = newcap // write before ptr to avoid a spill
  *a.ptr = newptr // with write barrier
}
newlen = len + 3 // recalculate to avoid a spill
*a.len = newlen
// with write barriers, if needed:
*(ptr+len) = e1
*(ptr+len+1) = e2
*(ptr+len+2) = e3
如果选择覆盖原变量,就不需要担心切片发生复制从而影响性能,因为 Go 语言已经对这种常见情况做了优化。
4.2 扩容方法
扩容是为切片分配新的内存地址,并且复制原切片中元素的过程,方法为 runtime.growslice。
growslice 函数在 append 期间处理切片的扩容,传入的参数有切片的元素类型、旧切片以及新的最小容量,该函数返回一个至少具有该容量的新切片,并将旧数据复制其中,新切片的长度设置为旧切片的长度,而不是新的容量,旧切片的长度用于计算在追加新元素写入的位置。
growslice 函数最终会返回一个新切片,其中包含了新的数组指针、大小和容量,这个返回的三元组最终会覆盖原切片。
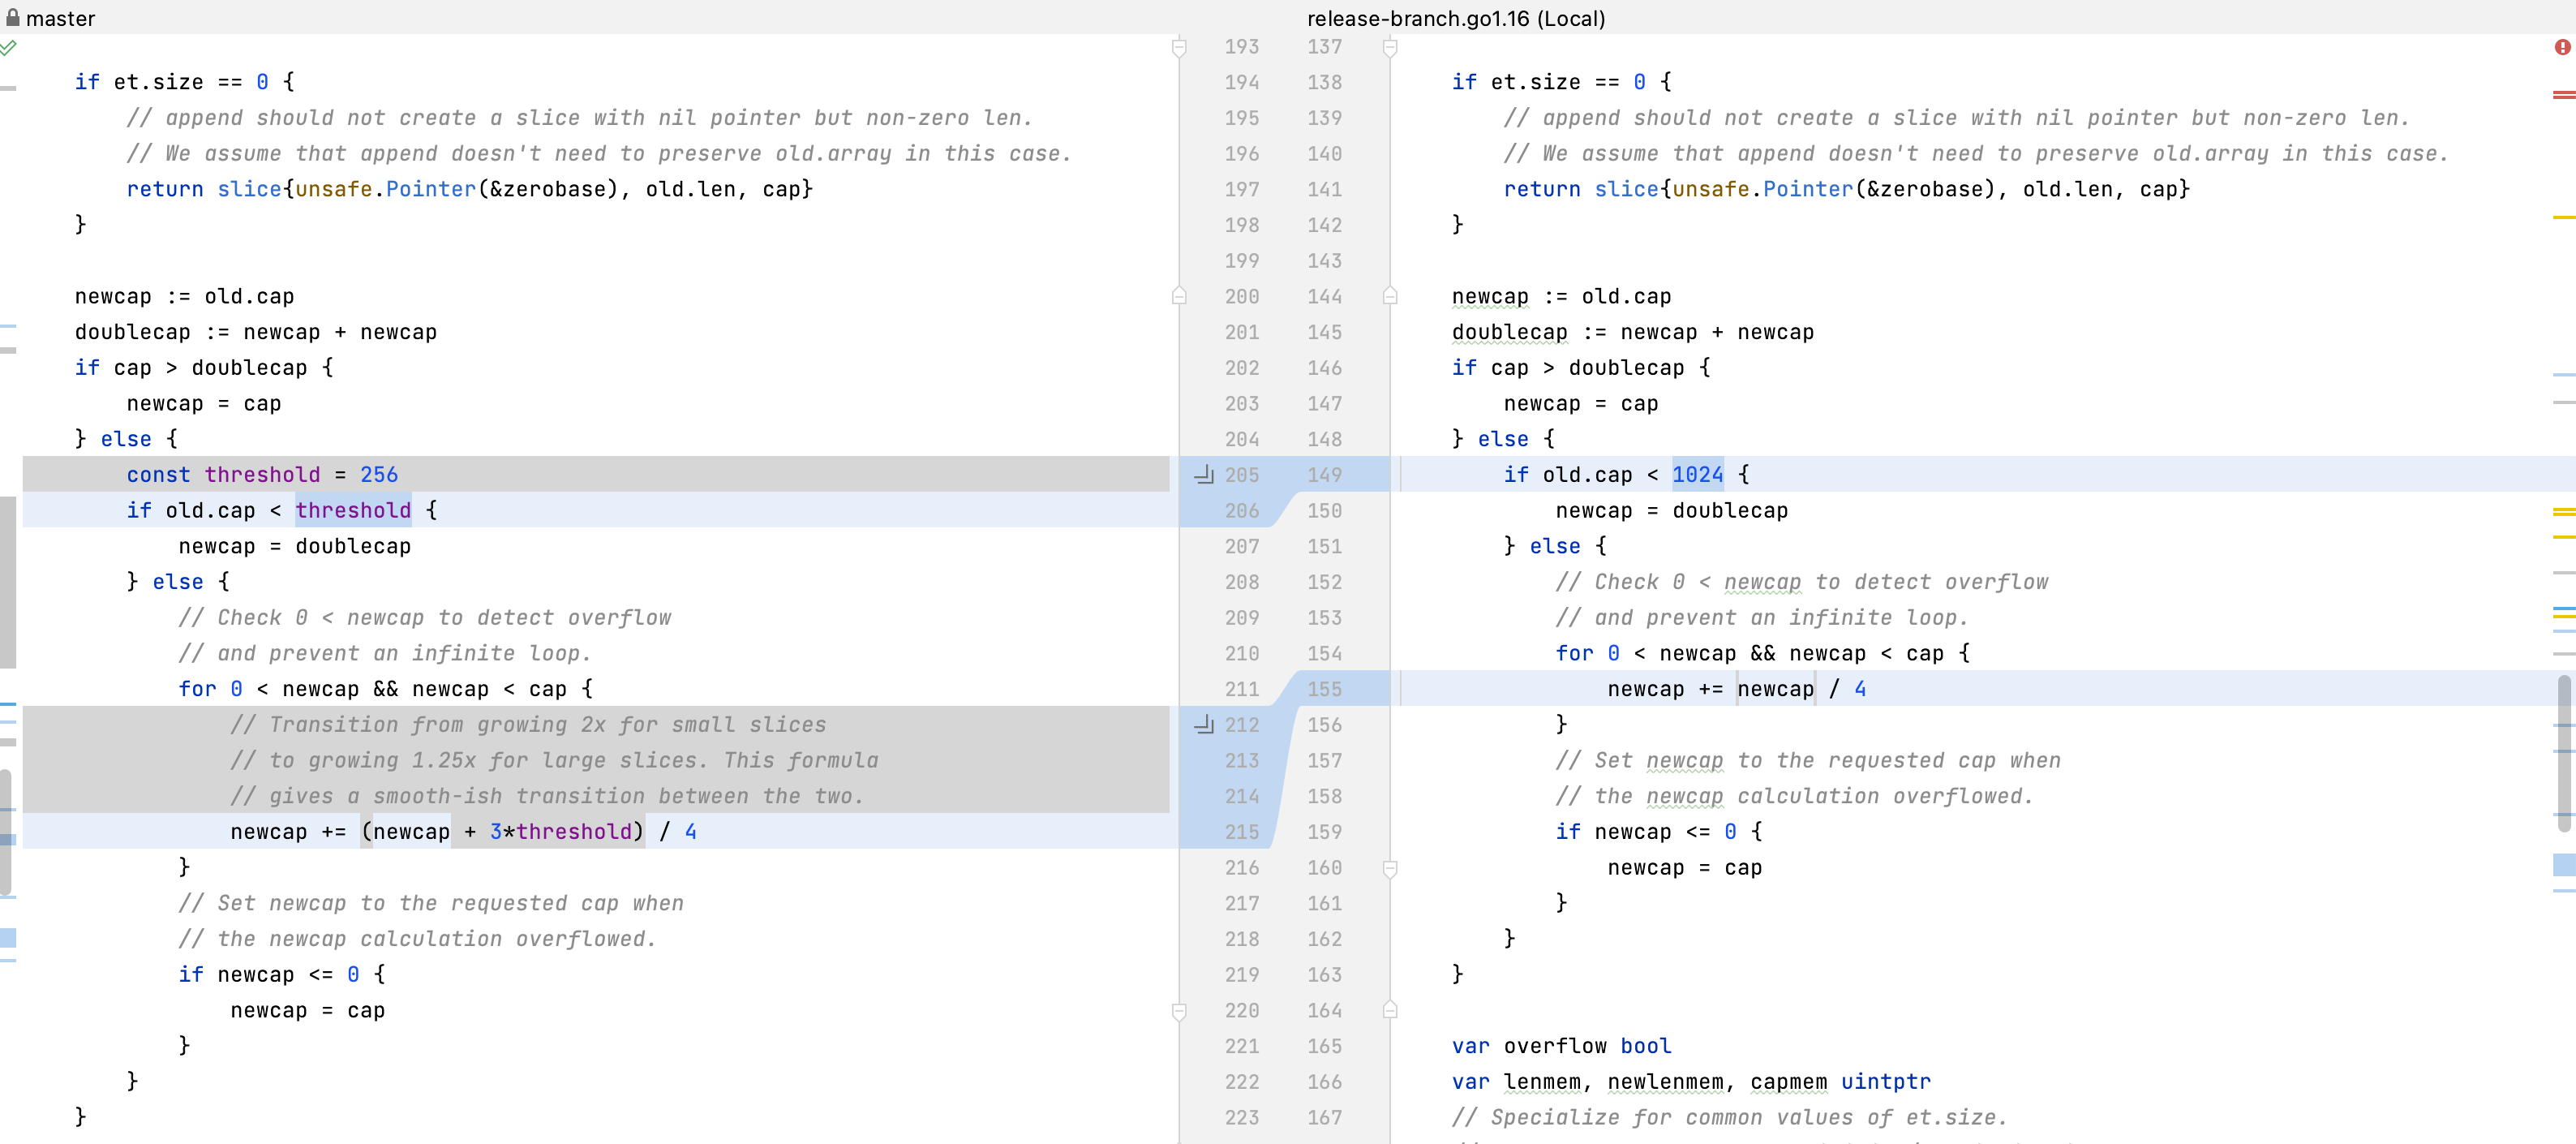
1. 容量预算
func growslice(et *_type, old slice, cap int) slice {

  ...

	newcap := old.cap
	doublecap := newcap + newcap
	if cap > doublecap {
		newcap = cap
	} else {
		if old.cap < 1024 {
			newcap = doublecap
		} else {
			// Check 0 < newcap to detect overflow
			// and prevent an infinite loop.
			for 0 < newcap && newcap < cap {
				newcap += newcap / 4
			}
			// Set newcap to the requested cap when
			// the newcap calculation overflowed.
			if newcap <= 0 {
				newcap = cap
			}
		}
	}

	...

}
在分配内存空间之前需要先确定新的切片容量,运行时根据当前的容量选择不同的策略进行扩容:
-
如果期望的容量大于当前容量的两倍,就会使用期望容量。
-
如果当前切片的容量小于 1024,则会将容量进行翻倍。
-
如果当前切片的容量大于 1024,就会每次增加 1/4 的容量,直到新容量大于期望容量。
-
如果当前切片的容量计算溢出或容量为0时,将容量设置为期望容量。
这里需要注意,最新代码已经不再以 1024 做比较,而是 256,并且当前切片大于 1024 时,也不再是每次扩容 1/4,而是 1/4 + 192。这个改动发生于 v1.18.1 版本,官方的说法是:对于容量小的切片,按照2倍的速率扩容和对于容量大的切片,按照1.25倍的速度扩容,为两者提供了平滑的过渡。
2. 内存对齐
上一步对切片的容量进行了计算,确定了切片的大致容量,实际上还需要根据切片中的元素大小进行内存对齐,当元素大小为 1、2 或 8 的倍数时,运行时便会进行内存对齐,代码如下:
var overflow bool
var lenmem, newlenmem, capmem uintptr
// Specialize for common values of et.size.
// For 1 we don't need any division/multiplication.
// For sys.PtrSize, compiler will optimize division/multiplication into a shift by a constant.
// For powers of 2, use a variable shift.
switch {
  case et.size == 1:
    lenmem = uintptr(old.len)
    newlenmem = uintptr(cap)
    capmem = roundupsize(uintptr(newcap))
    overflow = uintptr(newcap) > maxAlloc
    newcap = int(capmem)
  case et.size == sys.PtrSize:
    lenmem = uintptr(old.len) * sys.PtrSize
    newlenmem = uintptr(cap) * sys.PtrSize
    capmem = roundupsize(uintptr(newcap) * sys.PtrSize)
    overflow = uintptr(newcap) > maxAlloc/sys.PtrSize
    newcap = int(capmem / sys.PtrSize)
  case isPowerOfTwo(et.size):
    var shift uintptr
    if sys.PtrSize == 8 {
      // Mask shift for better code generation.
      shift = uintptr(sys.Ctz64(uint64(et.size))) & 63
    } else {
      shift = uintptr(sys.Ctz32(uint32(et.size))) & 31
    }
    lenmem = uintptr(old.len) << shift
    newlenmem = uintptr(cap) << shift
    capmem = roundupsize(uintptr(newcap) << shift)
    overflow = uintptr(newcap) > (maxAlloc >> shift)
    newcap = int(capmem >> shift)
  default:
    lenmem = uintptr(old.len) * et.size
    newlenmem = uintptr(cap) * et.size
    capmem, overflow = math.MulUintptr(et.size, uintptr(newcap))
    capmem = roundupsize(capmem)
    newcap = int(capmem / et.size)
}
其中,roundupsize 函数会将申请的内存向上取整,取整时会使用 runtime.class_to_size 数组,以提高内存的分配效率并减少碎片。
var class_to_size = [_NumSizeClasses]uint16{
	0, 8, 16, 24, 32, 48, 64, 80, 96, 112, 128, 144, 160, 176, 192, 208, 224, 240, 256, 288, 320, 352, 384, 416, 448,
	480, 512, 576, 640, 704, 768, 896, 1024, 1152, 1280, 1408, 1536, 1792, 2048, 2304, 2688, 3072, 3200, 3456, 4096,
	4864, 5376, 6144, 6528, 6784, 6912, 8192, 9472, 9728, 10240, 10880, 12288, 13568, 14336, 16384, 18432, 19072, 20480,
	21760, 24576, 27264, 28672, 32768,
}
默认情况下,会将目标容量和元素大小相乘得到占用的内存,如果计算新容量时发现内存溢出或者请求内存超过上限,程序会直接崩溃退出。
如果切片不是指针类型,那么会调用 runtime.memclrNoHeapPointers 将超出切片当前长度的位置清空,并在最后使用 runtime.memmove 将原数组内存中的内容复制到新申请的内存中。
3. 示例
假设有如下追加代码:
var arr []int64
arr = append(arr, 1, 2, 3, 4, 5)
上述代码执行时,会调用 runtime.growslice 函数进行扩容,并传入期望容量 5,这时期望分配的内存大小为 40 字节,不过由于切片中元素的大小等于 sys.PtrSize,因此会进行内存对齐,调用 runtime.roundupsize 向上取整为 48,因此新切片的容量为 48/8 = 6,并不是5。
实际验证代码:
package main

import (
	"fmt"
)

func main() {
	var arr []int64
	fmt.Println("old", len(arr), cap(arr))
	arr = append(arr, 1, 2, 3, 4, 5)
	fmt.Println("new", len(arr), cap(arr))
}
执行结果:
old 0 0
new 5 6
这里附上 Go 语言中各个基础类型的大小:
- bit(位):计算机中数据的最小单位,二进制数中的一个数位,0或者1
- Byte(字节):计算机中数据的基本单位,每8位(bit)组成一个字节
| 类型 | 大小 |
|---|---|
| int8 | 1字节 |
| int16 | 2字节 |
| int32 | 4字节 |
| int64 | 8字节 |
| int | 4字节(32位)/8字节(64位) |
| float32 | 4字节 |
| float64 | 8字节 |
| string | 1字节(英文)/2~4字节(中文,取决于字符编码类型) |
| bool | 1字节 |
5. 复制切片
复制操作并不常见,当使用 copy(a, b) 进行切片复制时,src/cmd/compile/internal/gc/walk.go@copyany 函数会分两种情况来进行处理:
-
编译器调用
copy(a, b) 会被转换成如下代码:
n := len(a) if n > len(b) { n = len(b) } if a.ptr != b.ptr { memmove(a.ptr, b.ptr, n*sizeof(elem(a))) } -
运行时调用
编译器会使用 runtime.slicecopy 函数替换运行期间调用的 copy,该函数代码如下:
func slicecopy(toPtr unsafe.Pointer, toLen int, fromPtr unsafe.Pointer, fromLen int, width uintptr) int {
	if fromLen == 0 || toLen == 0 {
		return 0
	}

	n := fromLen
	if toLen < n {
		n = toLen
	}

	if width == 0 {
		return n
	}

	size := uintptr(n) * width
	if raceenabled {
		callerpc := getcallerpc()
		pc := funcPC(slicecopy)
		racereadrangepc(fromPtr, size, callerpc, pc)
		racewriterangepc(toPtr, size, callerpc, pc)
	}
	if msanenabled {
		msanread(fromPtr, size)
		msanwrite(toPtr, size)
	}

	if size == 1 { // common case worth about 2x to do here
		// TODO: is this still worth it with new memmove impl?
		*(*byte)(toPtr) = *(*byte)(fromPtr) // known to be a byte pointer
	} else {
		memmove(toPtr, fromPtr, size)
	}
	return n
}
以上两种情况,复制时都会通过 runtime.memmove 将整块内存的内容复制到目标内存区域中,相较于依次复制,runtime.memmove 函数的性能更高,但需要注意该函数仍然会占用非常多的资源,在大切片上执行复制操作时一定要注意对性能的影响。
6. 总结
切片的很多功能都是由运行时实现的,无论是初始化、追加、扩容还是复制,都可能需要运行时的支持。需要注意,在遇到大切片扩容或复制时,可能会发生大规模的内存复制,一定要减少此类操作已避免对性能的影响。

 陕公网安备61011302000990号