1. 概述
这篇文章记录使用 kubesphere 官方的 kubekey 工具搭建多节点 k8s 集群的过程,安装的具体版本如下:
- kubekey:v1.2.0
- Kubernetes: v1.21.5
- Kubesphere: v3.2.0
我们的 k8s 集群的规划如下:
| 节点 | 角色 | IP | 配置 | 操作系统 |
|---|---|---|---|---|
| master | master, etcd | 192.168.1.100 | 4核4G50G | Ubuntu 20.04.3 LTS |
| node1 | worker | 192.168.1.101 | 8核8G100G | Ubuntu 20.04.3 LTS |
| node2 | worker | 192.168.1.102 | 8核8G100G | Ubuntu 20.04.3 LTS |
| node3 | worker | 192.168.1.103 | 8核8G100G | Ubuntu 20.04.3 LTS |
| nfs | 存储 | 192.168.1.104 | 4核4G450G | Ubuntu 20.04.3 LTS |
2. 准备工作
首先我们需要创建几个服务器,具体的操作步骤可以参考 R620搭建K8s集群 ,安装过程中调整 节点名称 和 ip地址 为我们上面规划的内容。创建后服务器并安装后系统后,我们需要为服务器进行一系列初始化操作,需要在每一台机器上执行,包括:
2.1 启动 root 账号
#!/bin/bash
echo "为root用户设置密码"
sudo passwd root

echo "切换root用户"
su
2.2 ssh 免密配置
这里先为每一台机器都创建秘钥
#!/bin/bash

echo "ssh设置"
ssh-keygen -t rsa -N '' -f ~/.ssh/id_rsa
# 启用root用户、关闭密码登录、启用秘钥登录、调整客户端连接超时配置
sed -i -e 's/#PermitRootLogin prohibit-password/PermitRootLogin yes/' -e 's/#PubkeyAuthentication yes/PubkeyAuthentication yes/' -e 's/PasswordAuthentication yes/PasswordAuthentication no/' -e 's/#ClientAliveInterval 0/ClientAliveInterval 60/' -e 's/#ClientAliveCountMax 3/ClientAliveCountMax 30/' /etc/ssh/sshd_config
# 重启sshd
service sshd restart
接着收集每一台机器的公钥以及操作机器的公钥,写入 每一台机器的 ~/.ssh/authorized_keys
#!/bin/bash
# 添加授权登陆的公钥
cat > ~/.ssh/authorized_keys <<EOF
# 这里替换为自己的机器公钥以及每一台机器的公钥,多个公钥之间需要换行
EOF
2.3 配置 hosts,添加各服务器的内网名称
#!/bin/bash
cat >> /etc/hosts <<EOF
192.168.1.100 master
192.168.1.101 node1
192.168.1.102 node2
192.168.1.103 node3
192.168.1.104 nfs
EOF
2.4 配置 dns
kubekey 安装时需要确保 网络和DNS 可用:
- 请确保
/etc/resolv.conf中的 DNS 地址可用,否则,可能会导致集群中的 DNS 出现问题。 - 如果您的网络配置使用防火墙规则或安全组,请务必确保基础设施组件可以通过特定端口相互通信。建议您关闭防火墙。有关更多信息,请参见端口要求 。
- 支持的 CNI 插件:Calico 和 Flannel。其他插件也适用(例如 Cilium 和 Kube-OVN 等),但请注意它们未经充分测试。
配置DNS的脚本如下:
#!/bin/bash
echo "处理dns"
sed -i 's/#DNS=/DNS=114.114.114.114/' /etc/systemd/resolved.conf
service systemd-resolved restart
systemctl enable systemd-resolved
mv /etc/resolv.conf /etc/resolv.conf.bak
ln -s /run/systemd/resolve/resolv.conf /etc/
echo ""
2.5 服务器简单初始化及必要软件安装
常用的软件包括 docker 和 docker-compose,当然,如果你使用别的 CRI,可以不装 docker,kubesphere 要求的 CNI 如下:
| 支持的容器运行时 | 版本 |
|---|---|
| Docker | 19.3.8+ |
| containerd(试验版,未经充分测试) | 最新版 |
| CRI-O(试验版,未经充分测试) | 最新版 |
| iSula(试验版,未经充分测试) | 最新版 |
脚本如下:
#!/bin/bash
echo "1. 设置时区为 Asia/Shanghai"
sudo timedatectl set-timezone Asia/Shanghai
echo ""

echo "2. 切换阿里源"
sudo cp -ra /etc/apt/sources.list /etc/apt/sources.list.bak
sudo sed -i -e 's#http://cn.archive.ubuntu.com/ubuntu#http://mirrors.aliyun.com/ubuntu#' -e 's#http://mirrors.tencentyun.com/ubuntu#http://mirrors.aliyun.com/ubuntu#' /etc/apt/sources.list
sudo apt-get update -y
sudo apt-get upgrade -y
echo ""

echo "3. 关闭防火墙和Selinux"
sudo ufw disable
sudo ufw status
sudo apt install -y policycoreutils
sudo sestatus -v
echo ""

echo "4. 关闭swap"
swapoff -a
echo ""

echo "5. 设置 alias"
echo "alias ll=\"ls -la\"" >> ~/.bash_profile
source ~/.bash_profile
echo ""

echo "6. 安装 docker"
sudo apt-get remove docker docker-engine docker.io containerd runc
sudo apt-get update
sudo apt-get install -y \
    net-tools \
    unzip \
    apt-transport-https \
    ca-certificates \
    curl \
    gnupg \
    lsb-release \
    conntrack
sudo curl -fsSL https://mirrors.aliyun.com/docker-ce/linux/ubuntu/gpg | sudo apt-key add -
sudo add-apt-repository "deb [arch=amd64] https://mirrors.aliyun.com/docker-ce/linux/ubuntu $(lsb_release -cs) stable"
sudo apt-get update
sudo apt-get install -y docker-ce docker-ce-cli containerd.io
mkdir /etc/docker
sudo cat > /etc/docker/daemon.json <<EOF
{
    "exec-opts": ["native.cgroupdriver=systemd"],
    "log-driver": "json-file",
    "log-opts": {
    "max-size": "100m"
    },
    "storage-driver": "overlay2",
    "registry-mirrors":[
        "https://mirror.ccs.tencentyun.com",
        "https://docker.mirrors.ustc.edu.cn",
        "https://registry.docker-cn.com"
    ]
}
EOF
sudo systemctl daemon-reload
sudo systemctl restart docker
sudo systemctl enable docker
echo ""

echo "7. 安装 docker compose"
sudo curl -L "http://download.lerzen.com/docker-compose-Linux-x86_64" -o /usr/local/bin/docker-compose
sudo chmod +x /usr/local/bin/docker-compose
docker-compose --version
echo ""

echo "8. 安装 nfs 客户端"
apt install -y nfs-common
echo ""
nfs 服务器需要安装 nfs 服务端,并设置目录:
#!/bin/bash
# server
mkdir -p /data/nfs/k8s
sudo apt install -y nfs-kernel-server
sudo systemctl start nfs-kernel-server.service
sudo systemctl enable nfs-kernel-server.service
sudo echo "/data/nfs *(rw,async,no_subtree_check,no_root_squash)" >> /etc/exports
sudo exportfs -a
3. 开始安装
3.1 下载安装 Kubekey
先执行以下命令以确保您从正确的区域下载 KubeKey:
export KKZONE=cn
执行以下命令下载 KubeKey:
curl -sfL https://get-kk.kubesphere.io | VERSION=v1.2.0 sh -
下载 KubeKey 后,如果您将其传输至访问 Googleapis 同样受限的新机器,请您在执行以下步骤之前务必再次执行
export KKZONE=cn命令。
为 kk 添加可执行权限:
chmod +x kk
3.2 创建集群配置文件
使用如下命令生成集群配置文件,对应的参数说明:
- –with-kubernetes:指定 k8s 版本
- –with-kubesphere:指定 kubesphere 版本
- -f:生成的配置文件路径
./kk create config --with-kubernetes v1.21.5 --with-kubesphere v3.2.0 -f ./kk-config.yaml
3.3 编辑配置文件
生成配置文件后,需要修改配置文件内容,增加 节点信息 及 存储类 信息。
节点信息 hosts
-
name:实例的主机名。 -
address:任务机和其他实例通过 SSH 相互连接所使用的 IP 地址。根据您的环境,可以是公有 IP 地址或私有 IP 地址。例如,一些云平台为每个实例提供一个公有 IP 地址,用于通过 SSH 访问。在这种情况下,您可以在该字段填入这个公有 IP 地址。 -
internalAddress:实例的私有 IP 地址。 -
username:登录账号,默认为root -
password:登录密码 -
privateKeyPath:使用秘钥登录时的秘钥路径
创建集群前,请确保提供的 ip、账号、密码或秘钥可以正常登录,并且确保端口
6443没有被其他服务占用,否则在安装时会产生冲突(6443为 API 服务器的默认端口)。
节点角色信息 roleGroups
etcd:etcd 节点名称master:主节点名称worker:工作节点名称
存储信息 addons
addons 字段下指定存储信息,从而自定义持久化存储插件,例如 NFS 客户端、Ceph RBD、GlusterFS 等。有关更多信息,请参见持久化存储配置
。
KubeSphere 会默认安装 OpenEBS ,为开发和测试环境配置 LocalPV ,方便新用户使用。在本多节点安装示例中,使用了默认存储类型(本地存储卷)。对于生产环境,您可以使用 Ceph/GlusterFS/CSI 或者商业存储产品作为持久化存储解决方案。
这里提供下 nfs 的存储类配置:
nfs:
  server: "192.168.1.104"    # This is the server IP address. Replace it with your own.
  path: "/data/k8s"    # Replace the exported directory with your own.
storageClass:
  defaultClass: true
对应的 addons 配置,其中 valuesFile 为上面 nfs 存储类配置文件的路径:
 addons:
  - name: nfs-client
    namespace: kube-system
    sources:
      chart:
        name: nfs-client-provisioner
        repo: https://charts.kubesphere.io/main
        valuesFile: /root/k8s/nfs-client.yaml
完整的实例配置如下:
apiVersion: kubekey.kubesphere.io/v1alpha1
kind: Cluster
metadata:
  name: sample
spec:
  hosts:
  - {name: master, address: 192.168.1.100, internalAddress: 192.168.1.100, privateKeyPath: "~/.ssh/id_rsa"}
  - {name: node1, address: 192.168.1.101, internalAddress: 192.168.1.101, privateKeyPath: "~/.ssh/id_rsa"}
  - {name: node2, address: 192.168.1.102, internalAddress: 192.168.1.102, privateKeyPath: "~/.ssh/id_rsa"}
  - {name: node3, address: 192.168.1.103, internalAddress: 192.168.1.103, privateKeyPath: "~/.ssh/id_rsa"}
  roleGroups:
    etcd:
    - master
    master:
    - master
    worker:
    - node1
    - node2
    - node3
  controlPlaneEndpoint:
    ##Internal loadbalancer for apiservers
    #internalLoadbalancer: haproxy

    domain: lb.kubesphere.local
    address: ""
    port: 6443
  kubernetes:
    version: v1.21.5
    clusterName: cluster.local
  network:
    plugin: calico
    kubePodsCIDR: 10.233.64.0/18
    kubeServiceCIDR: 10.233.0.0/18
  registry:
    registryMirrors: []
    insecureRegistries: []
  addons:
    - name: nfs-client
      namespace: kube-system
      sources:
        chart:
          name: nfs-client-provisioner
          repo: https://charts.kubesphere.io/main
          valuesFile: /root/k8s/nfs-client.yaml


---
apiVersion: installer.kubesphere.io/v1alpha1
kind: ClusterConfiguration
metadata:
  name: ks-installer
  namespace: kubesphere-system
  labels:
    version: v3.2.0
spec:
  persistence:
    storageClass: ""
  authentication:
    jwtSecret: ""
  local_registry: ""
  # dev_tag: ""
  etcd:
    monitoring: false
    endpointIps: localhost
    port: 2379
    tlsEnable: true
  common:
    core:
      console:
        enableMultiLogin: true
        port: 30880
        type: NodePort
    # apiserver:
    #  resources: {}
    # controllerManager:
    #  resources: {}
    redis:
      enabled: false
      volumeSize: 2Gi
    openldap:
      enabled: false
      volumeSize: 2Gi
    minio:
      volumeSize: 20Gi
    monitoring:
      # type: external
      endpoint: http://prometheus-operated.kubesphere-monitoring-system.svc:9090
      GPUMonitoring:
        enabled: false
    gpu:
      kinds:
      - resourceName: "nvidia.com/gpu"
        resourceType: "GPU"
        default: true
    es:
      # master:
      #   volumeSize: 4Gi
      #   replicas: 1
      #   resources: {}
      # data:
      #   volumeSize: 20Gi
      #   replicas: 1
      #   resources: {}
      logMaxAge: 7
      elkPrefix: logstash
      basicAuth:
        enabled: false
        username: ""
        password: ""
      externalElasticsearchUrl: ""
      externalElasticsearchPort: ""
  alerting:
    enabled: false
    # thanosruler:
    #   replicas: 1
    #   resources: {}
  auditing:
    enabled: false
    # operator:
    #   resources: {}
    # webhook:
    #   resources: {}
  devops:
    enabled: false
    jenkinsMemoryLim: 2Gi
    jenkinsMemoryReq: 1500Mi
    jenkinsVolumeSize: 8Gi
    jenkinsJavaOpts_Xms: 512m
    jenkinsJavaOpts_Xmx: 512m
    jenkinsJavaOpts_MaxRAM: 2g
  events:
    enabled: false
    # operator:
    #   resources: {}
    # exporter:
    #   resources: {}
    # ruler:
    #   enabled: true
    #   replicas: 2
    #   resources: {}
  logging:
    enabled: false
    containerruntime: docker
    logsidecar:
      enabled: true
      replicas: 2
      # resources: {}
  metrics_server:
    enabled: false
  monitoring:
    storageClass: ""
    # kube_rbac_proxy:
    #   resources: {}
    # kube_state_metrics:
    #   resources: {}
    # prometheus:
    #   replicas: 1
    #   volumeSize: 20Gi
    #   resources: {}
    #   operator:
    #     resources: {}
    #   adapter:
    #     resources: {}
    # node_exporter:
    #   resources: {}
    # alertmanager:
    #   replicas: 1
    #   resources: {}
    # notification_manager:
    #   resources: {}
    #   operator:
    #     resources: {}
    #   proxy:
    #     resources: {}
    gpu:
      nvidia_dcgm_exporter:
        enabled: false
        # resources: {}
  multicluster:
    clusterRole: none
  network:
    networkpolicy:
      enabled: false
    ippool:
      type: none
    topology:
      type: none
  openpitrix:
    store:
      enabled: false
  servicemesh:
    enabled: false
  kubeedge:
    enabled: false
    cloudCore:
      nodeSelector: {"node-role.kubernetes.io/worker": ""}
      tolerations: []
      cloudhubPort: "10000"
      cloudhubQuicPort: "10001"
      cloudhubHttpsPort: "10002"
      cloudstreamPort: "10003"
      tunnelPort: "10004"
      cloudHub:
        advertiseAddress:
          - ""
        nodeLimit: "100"
      service:
        cloudhubNodePort: "30000"
        cloudhubQuicNodePort: "30001"
        cloudhubHttpsNodePort: "30002"
        cloudstreamNodePort: "30003"
        tunnelNodePort: "30004"
    edgeWatcher:
      nodeSelector: {"node-role.kubernetes.io/worker": ""}
      tolerations: []
      edgeWatcherAgent:
        nodeSelector: {"node-role.kubernetes.io/worker": ""}
        tolerations: []
3.4 开始安装
安装过程会特别漫长,耐心等待即可,安装命令如下:
./kk create cluster -f kk-config.yaml
如果看到如下内容说明安装成功:
#####################################################
###              Welcome to KubeSphere!           ###
#####################################################

Console: http://192.168.1.100:30880
Account: admin
Password: P@88w0rd

NOTES:
  1. After you log into the console, please check the
     monitoring status of service components in
     the "Cluster Management". If any service is not
     ready, please wait patiently until all components
     are up and running.
  2. Please change the default password after login.

#####################################################
https://kubesphere.io             20xx-xx-xx xx:xx:xx
#####################################################
使用上面提供的地址、账号及密码就可以访问 kubesphere 的控制台了。
3.5 启用 kubectl 自动补全功能
#!/bin/bash
# Install bash-completion
apt-get install bash-completion

# Source the completion script in your ~/.bashrc file
echo 'source <(kubectl completion bash)' >>~/.bashrc

# Add the completion script to the /etc/bash_completion.d directory
kubectl completion bash >/etc/bash_completion.d/kubectl
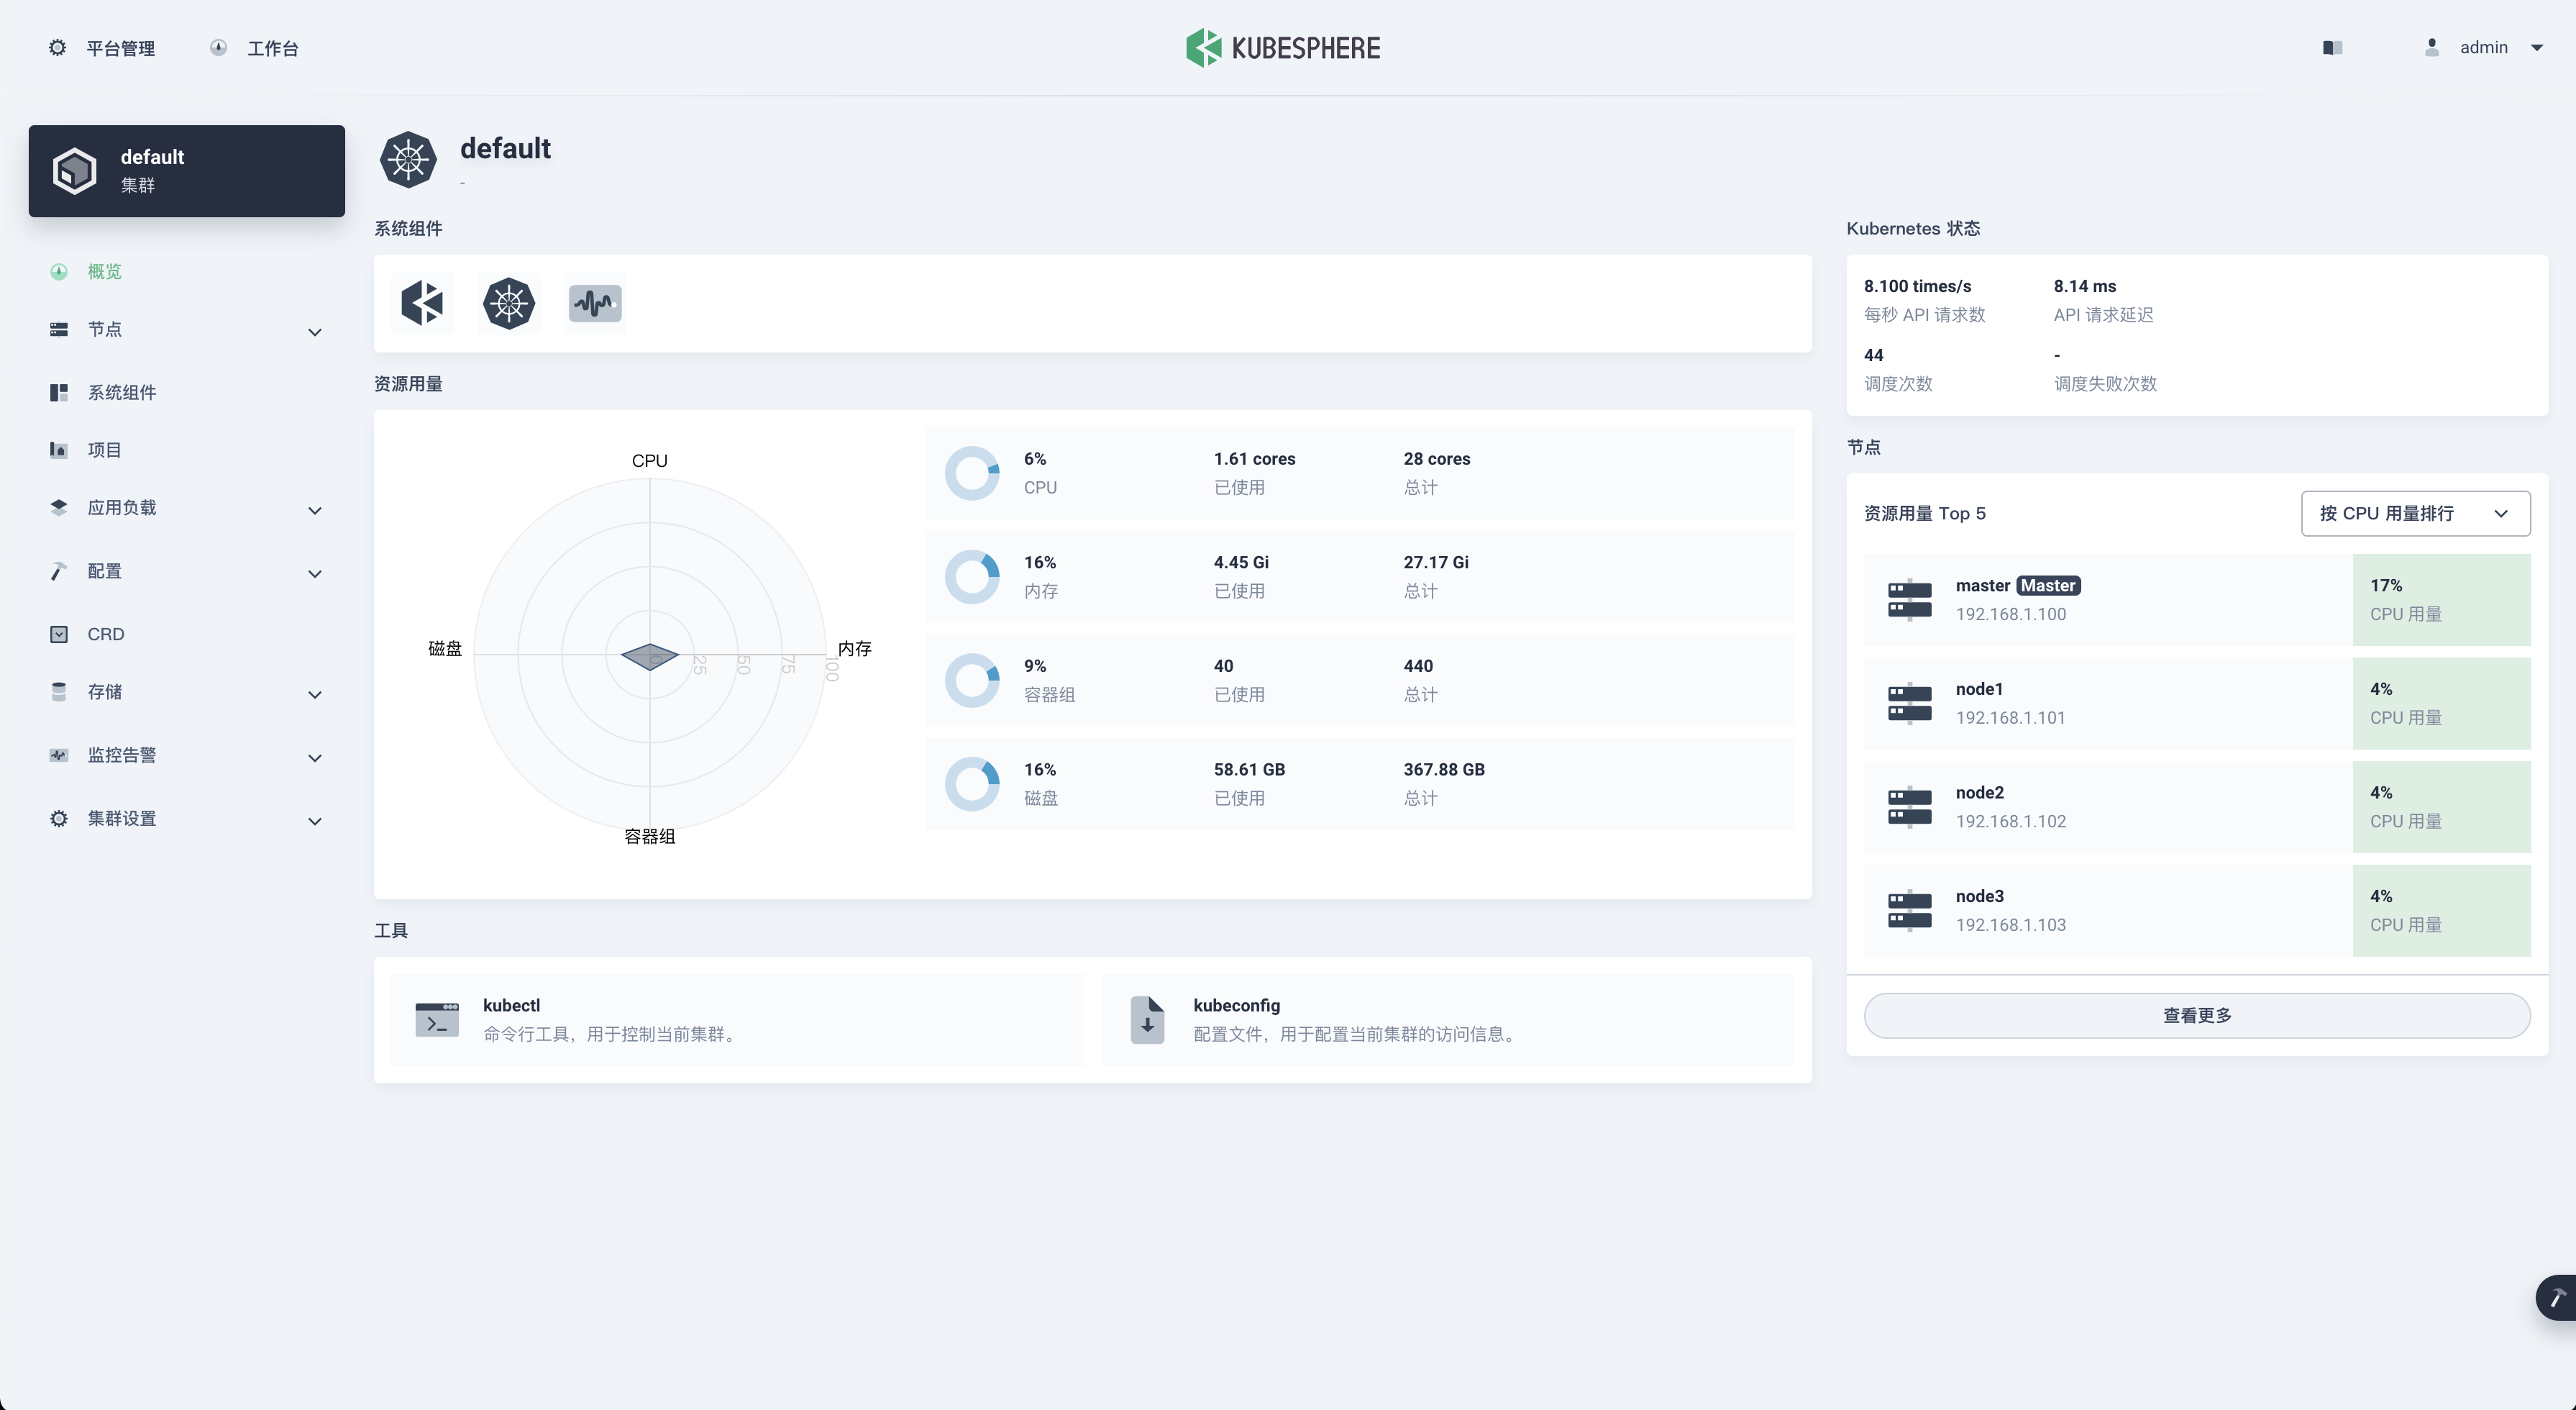
4. 总结
至此,多节点 k8s 集群及 kubesphere 就安装好了,如下所示:

 陕公网安备61011302000990号